Table of Contents
Ready to ditch the dumbbells and try something new? Kettlebells are not just for swings and squats; they're amazing for building a powerful back and biceps. If you're looking to shake up your routine and get real results, then you've come to the right place. We're diving into the world of the back and bicep kettlebell workout, with a master trainer, Mike Silverman, who is going to show you three killer exercises that will target those muscles directly. Forget endless curls and pull-ups; these moves use a kettlebell to engage multiple muscle groups, giving you more bang for your buck. First, we'll break down each exercise, teaching you the correct form and technique, so you can avoid injuries and maximize your gains. Then, if you're up for a challenge, we've got a high-intensity kettlebell EMOM (Every Minute On the Minute) routine that will push your limits. So, grab a kettlebell, and let's get started!
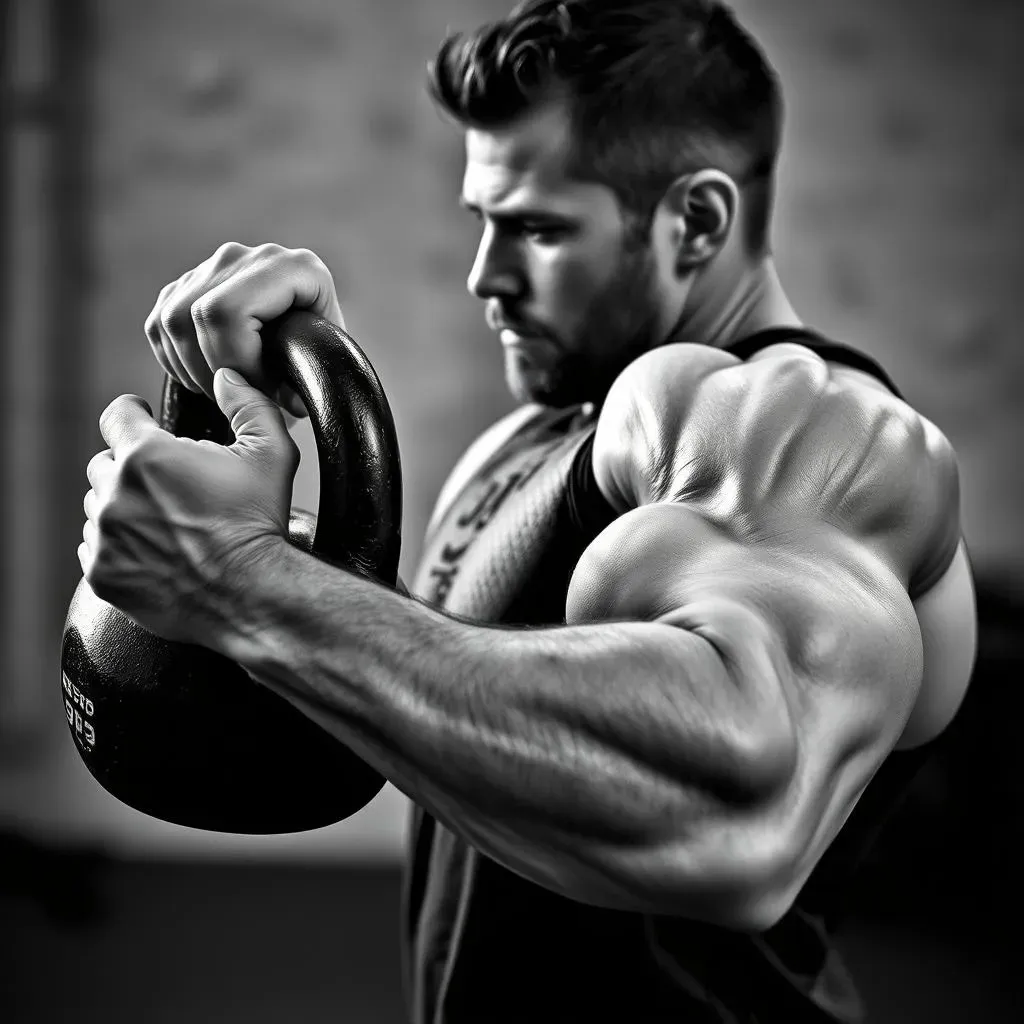
Kettlebell Crush Curl: Biceps Blaster

Kettlebell Crush Curl: Biceps Blaster
The Secret Sauce to Bicep Gains
Alright, let's talk about the Kettlebell Crush Curl, a move that's way more than just a regular curl. It's like a bicep party, but your chest and front delts are invited too! You're going to grab that kettlebell by the horns, or the sides of the handle if you want to be precise, and hold it right in front of your chest. Now, here's the key: instead of just lifting the weight, you're going to squeeze, like you're trying to crush the kettlebell between your hands. This is why it's called a "crush" curl. It's not just about lifting; it's about engaging all the muscles involved. You'll feel it in your biceps, for sure, but also in your chest and shoulders. It's a compound move disguised as a simple curl, and that's what makes it so awesome.
The magic is in the squeeze, seriously. You don't want to just go through the motions. Think about actively pressing your palms together as you lift the kettlebell, keeping the tension throughout the entire movement. This isn't about how much weight you can lift; it's about how effectively you can engage your muscles. Imagine trying to make the kettlebell smaller, like you're squishing it. As you curl, focus on keeping your elbows tucked in, not flaring out. This will help keep the focus on your biceps and not let your shoulders take over. Try doing 4 sets of 10 reps, taking a short rest of 30-60 seconds between each set. Trust me, your biceps will be singing.
Quick Tips for Crush Curl Domination
- Grip it tight: Squeeze the kettlebell like you mean it.
- Elbows in: Keep those elbows tucked to your sides.
- Feel the burn: Focus on the squeeze and muscle engagement, not just the lift.
- Controlled movement: Don't rush; keep the movement smooth and controlled.
Common Mistakes to Avoid
One of the most common errors is not squeezing the kettlebell enough. It's easy to just lift the weight, but that misses the whole point of the crush curl. Also, people tend to let their elbows flare out, which takes the tension off the biceps and puts it on the shoulders. This can lead to shoulder pain, so keep those elbows tucked. Another mistake? Using too much weight. It's better to start lighter and focus on proper form and squeeze than to go heavy and risk injury. If you're struggling to maintain the squeeze or your elbows are flaring, it’s a sign to drop the weight.
Finally, avoid rushing the movement. This isn't a race, it's about quality muscle engagement. If you rush, you'll lose the tension and the effectiveness of the exercise. Control the kettlebell both on the way up and on the way down. The eccentric phase, when you lower the weight, is just as important as the concentric phase, when you lift it. Keep it slow and controlled, and you'll get the most out of each rep. Remember, it's not about how many reps you can do, it's about how well you do each one.
“The key to any exercise is not just the movement, but the intention behind it. With the crush curl, that intention is to engage and squeeze every muscle involved, making it more than just a lift.” - Mike Silverman
Kettlebell Drop Row: Sculpting Your Back

Kettlebell Drop Row: Sculpting Your Back
Unlocking Back Strength with the Drop Row
Okay, so you've crushed those curls, now let's get to work on your back! The Kettlebell Drop Row is a fantastic way to target your mid to upper back muscles, and it's not your typical row. It's going to challenge your core and your lower back, too. You'll start by holding a kettlebell in one hand, letting it hang down towards the floor. Now, instead of just pulling the kettlebell up towards your chest, you're going to drop your torso slightly as you row. Think of it like you’re doing a hinge at the hips, letting the kettlebell drop slightly, and then rowing it back up. It’s like a seesaw, but with your body and the kettlebell. This drop adds an extra challenge, engaging more of your back muscles, which is why this move is so effective.
The key here is control. You're not just swinging the weight; you're controlling the dynamic load. As you drop your torso, keep your glutes and core engaged to protect your lower back. It's like you're creating a solid foundation with your lower body, so your upper body can do its thing. As you row, focus on pulling your elbow back towards the ceiling, squeezing your shoulder blades together at the top of the movement. The drop row is not just about lifting the weight; it’s about the controlled movement and engaging the right muscles. Try doing 4 sets of 10 reps on each side, resting for 30-60 seconds between sets. You’ll feel your back working hard, but it'll be worth it.
Key Points for an Effective Drop Row
- Engage your core: Keep your abs tight throughout the movement.
- Hinge at the hips: Don't just bend over; hinge at the hips to protect your lower back.
- Control the drop: Don't let the kettlebell drop uncontrollably; lower it with intention.
- Squeeze your shoulder blades: Focus on pulling your elbow back and squeezing your shoulder blades together at the top of the row.
Mistakes to Avoid
A common mistake is rounding your back as you drop, which can put a lot of stress on your lower back. To avoid this, make sure you’re hinging at the hips and keeping your back straight. Another mistake is using too much weight. If you’re struggling to control the drop or keep your back straight, it’s a sign to lighten the load. You need to have good control over the kettlebell, so you’re not just swinging it around. It's better to start with a lighter weight and focus on form and technique, then increase the weight as you get stronger. Also, people tend to rush the movement. Try to control both the lowering and lifting phases for maximum muscle engagement.
Finally, some might forget to keep their core engaged. If your core is not tight, your lower back is going to take the brunt of the stress, which can lead to pain and injury. Keep your abs tight, like you're bracing for a punch. Remember, the kettlebell drop row is not just about your back; it's about your entire body working together in a controlled and coordinated manner. The controlled drop and the squeeze of your shoulder blades are where the magic happens, so focus on those aspects to get the most out of the move.
"It's not about how heavy you lift; it's about how well you control the weight. The kettlebell drop row is a perfect example of how a controlled movement can lead to more effective muscle engagement and overall strength." - Mike Silverman
Braced Kettlebell RDL: Lower Back Strength

Braced Kettlebell RDL: Lower Back Strength
The Power of the Braced RDL
Okay, so we've hit the biceps and the mid-back, now it's time to build some serious lower back strength. The Braced Kettlebell RDL, or Romanian Deadlift, is not just about lifting a weight; it’s about building a stable, powerful foundation for all your other movements. Think of it as the bedrock of your strength. You’ll hold the kettlebell in front of you, brace your abs against it, and hinge at the hips, lowering the kettlebell towards the ground while keeping your back straight. It’s like you're trying to touch the ground with the kettlebell, but your back is saying, "Nope, we're staying straight." This move is crucial for building strength for swings, deadlifts, and snatches, and it’s a fantastic exercise to help protect your lower back from injury.
What’s special about the braced version? Well, bracing your abs against the kettlebell gives you an extra layer of stability and also helps you learn how to engage your core properly. You're essentially creating a solid wall with your abs, which is super important for maintaining good form and protecting your spine. As you lower the kettlebell, focus on pushing your hips back, keeping your back flat, and your core engaged. You should feel a stretch in your hamstrings, not in your lower back. Then, as you come back up, squeeze your glutes and drive your hips forward, returning to the starting position. It’s not a squat; it’s a hinge. Try doing 4 sets of 10 reps, resting for 30-60 seconds between sets. You'll feel those lower back muscles getting stronger with each rep.
Key Elements of a Solid Braced RDL
- Brace your abs: Push your abs against the kettlebell to create stability.
- Hinge at the hips: Push your hips back and keep your back straight.
- Feel the stretch: You should feel a stretch in your hamstrings, not your lower back.
- Squeeze your glutes: Engage your glutes as you return to the starting position.
Avoiding Common Mistakes
One of the biggest mistakes is rounding your back. This puts unnecessary pressure on your lower back, and that's the opposite of what we want. To avoid this, focus on hinging at the hips and keeping a straight back throughout the movement. Another common error is not bracing your abs against the kettlebell. This is the "braced" part of the exercise, and it’s essential for maintaining a stable core. If you’re not bracing, you’re missing out on a key benefit of the move. Also, some people tend to turn this into a squat. Remember, it’s a hip hinge, not a squat. The movement should be primarily at your hips, with your knees only slightly bent.
Finally, don't use too much weight, especially when you're just starting out. It’s better to start with a lighter weight and focus on proper form and technique, than to go heavy and risk injury. It's more important to master the form and technique, then gradually increase the weight as you get stronger. Also, avoid rushing the movement. Control the kettlebell both on the way down and on the way up. The eccentric phase, when you lower the weight, is just as important as the concentric phase, when you lift it. Keep it slow and controlled, and you'll get the most out of each rep. Remember, it's not about how many reps you can do, it's about how well you do each one.
"The braced kettlebell RDL is not just about lifting weight, it's about building a strong foundation for all your movements. Focus on the hinge, the brace, and the squeeze, and you'll unlock a new level of strength." - Mike Silverman
3Move Kettlebell EMOM for Back and Biceps
3Move Kettlebell EMOM for Back and Biceps
EMOM: The Time-Based Challenge
Okay, so you've mastered the individual moves, now let's put them all together in a fun, challenging format – the EMOM, or Every Minute On the Minute. This workout is designed to push your limits and get your heart rate up. Here's how it works: you perform a set number of reps of an exercise at the start of each minute. If you finish before the minute is up, you rest for the remainder of that minute. Then, when the next minute starts, you do the next exercise. It’s a great way to keep the intensity high and the workout engaging. For this 3-move kettlebell EMOM for back and biceps, we'll be using all the moves we've covered: the crush curl, the drop row, and the braced RDL. This is where you really see how the exercises work together to build a complete upper-body workout.
For this EMOM, you’ll perform 10 reps of each exercise. So, at the start of minute one, you’ll do 10 crush curls. Then, rest until the start of minute two, when you’ll perform 10 drop rows (5 on each side). And finally, at the start of minute three, you’ll do 10 braced RDLs. After the RDLs, you start back at the crush curls and repeat the cycle. This is one round. For a good workout, try to do 4-6 rounds. The beauty of EMOM is that it is adjustable. If 10 reps is too much for you, you can reduce the number. If it’s too easy, you can increase the reps or the number of rounds. Remember, this isn’t a race; it’s about quality over quantity. Focus on maintaining good form, and you’ll see the results.
EMOM Breakdown
Minute | Exercise | Reps |
|---|---|---|
1 | Kettlebell Crush Curl | 10 |
2 | Kettlebell Drop Row | 10 (5 each side) |
3 | Braced Kettlebell RDL | 10 |
Tips for Crushing Your EMOM
First, pick a weight that allows you to complete all reps of each exercise with good form. The goal is to challenge yourself, not to injure yourself. Also, the rest periods are short, so be ready to transition quickly between exercises. You'll want to have your kettlebell in a convenient location. Also, don't compromise your form just to make the time. If you can’t complete the reps with good form, it’s okay to reduce the reps or the weight. This is about consistency and quality, not just speed. Remember to stay hydrated, and breathe properly throughout the workout. This might be a good time to put on some music to keep you motivated.
Finally, listen to your body. If you're feeling pain, stop. This workout is meant to be challenging, but it shouldn't be painful. If you're new to EMOMs, you might start with 3 rounds and see how you feel. If you’re more advanced, you can bump it up to 6 rounds or add more reps. The main thing is to have fun and enjoy the process. You will feel your muscles working hard, and your heart rate will go up, but that's where the magic happens. This 3-move kettlebell EMOM for back and biceps is a great way to get a full-body workout in a short amount of time, and it’s a fun way to challenge yourself. So, give it a try and see how you feel. You might surprise yourself!
“The EMOM format is about efficiency. It’s about getting the most out of your workout in the shortest amount of time. It’s a challenge, but it’s also a great way to see your progress and push your limits.” - Mike Silverman
Wrapping Up Your Kettlebell Back and Biceps Journey
Alright, you've now got a solid plan for a back and bicep kettlebell workout. These aren't your typical gym exercises; they're designed to work your muscles in a more functional way, building strength and stability. Remember, it's not about throwing the weight around; it's about controlled movements and proper form. Whether you're doing the individual exercises or the EMOM, focus on engaging the right muscles and listen to your body. Consistency is key, so try to incorporate these moves into your routine regularly to see real progress. Now, go grab that kettlebell and get to work! You've got this.